COCONUT MACAROONS

>> Sunday, May 16, 2010


So: I ended up making coconut macaroons. And they were wonderful.


I feel a bit traitorous saying this because they were so lovely (and if I could, I'd eat about three in a row!) but to tell the truth, I was hoping for something slightly different to what emerged from my oven. I had visions of those beautiful golden brown coconut rochers (rochers à la noix de coco or congolais) that they sell in french pâtisseries: dense and heavy with soft and chewy centres. Do you know the ones? Somehow I ended up with a different kind. Mine were cream coloured, flushed with a pinky golden hue, softer and more like meringue. Beautiful. But not quite what I was expecting.


I think I was a bit reckless with my recipe choice. I consulted a couple of the books on my shelf and Nigella's website, found photographs of delicate looking pale macaroons and thought to myself, ok, well, maybe they'll look different when I bake them; you must just have to cook them for longer to achieve that caramelly golden shell. I'd give it a go. Not so. After a little more research I discovered there are several ways to make macaroons...


The biggest difference is in the preparation of the egg. You either make a meringue mixture with sugar and egg whites into which you stir the coconut and other ingredients, or; you add the egg whites (or whole eggs) to the rest of the ingredients with little or no whisking. Some people only use egg whites, others add the yolks. Some use condensed milk and others use flour. The variations are apparently endless... So little wonder I didn't find the exact ones I was looking for on my first shot. Who knew there were so many different ways to make a simple macaroon?!


Anyway, while I didn't find my perfect coconut macaroon, I did find a perfectly lovely alternative. These macaroons are light and delicate but have a soft and moist interior with a wonderful coconut flavour. Chris declared them incredible and suggested they might be even better if dipped in some melted dark chocolate (something to try next time!).


So I guess that proves that sometimes it's good to make mistakes - you might just find something delicious which you would never have otherwise tried.


COCONUT MACAROONS
(adapted from Nigella Lawson's website)

2 large egg whites (1/4 cup)
1/4 teaspoon cream of tartar
100g caster sugar (1/2 cup)
30g ground almonds (1/3 cup)
1 teaspoon vanilla essence (or coconut essence if available)
250g shredded or desiccated coconut (3 cups)
pinch of salt


Preheat the oven to 170ºC/gas mark 3.

Beat the egg whites until frothy – no more – then add the cream of tartar and carry on beating until soft peaks are formed.

Add the sugar a teaspoon at a time and whisk until the mixture is very thick and glossy.

Fold in the almonds, salt, vanilla and coconut. The mixture will be sticky but should hold its shape when spooned together.

On a lined baking tray, form into 4cm diameter sized domes. Make sure to pile the mixture up as high as you can to maintain a nicely rounded cookie - they tend to flatten out as they cook.

Cook for 20 minutes or until they've just turned an even golden brown.

Read more...

VANILLA CUSTARD WITH BAKED SPICED RHUBARB

>> Saturday, May 8, 2010


For some reason I have always associated rhubarb with winter.

Even the name sounds barren and hardy; a vegetable to brave the cold. That’s right, vegetable. Even though it’s pink and us westerners always eat it sweetened or as a compliment to meat, it’s a vegetable which starts to appear in early spring and most certainly is not a fruit. It’ll boost your Vitamin C levels and up your dietary fibre, but if you need more than just one excuse to add it to your shopping basket; it sure is pretty.


Up until he moved into a rest home a few years ago, my pépé has always grown his own rhubarb in his back garden. Huge, enthusiastic plants which exploded from the ground and took over their corner of the vegetable patch. I can always remember him grabbing his French Opinel knife and stretching down without bending his knees to cut a healthy bunch of thick rhubarb into a plastic bag for us to take home. No one else we knew grew rhubarb (or really ate it) and as a result I tend to associate it with my family more than any other vegetable or fruit. All the rhubarb my grandfather grew was either melted down into a delicious, caramely compote by my grandmother, stewed to go on top of cereal or added to a fruit crumble.

To me, rhubarb will always be a particularly French vegetable.


But I’m in London, and last weekend was cold and windy and didn’t quite know what to do with itself. So I made something typically English.

Rhubarb and custard.


Oh deliciousness. The rhubarb is tart and syrupy sweet, and leaves your mouth slightly dry. The custard is velvety, luxurious and tastes just how home should make you feel; warm and contented.

I felt a bit naughty using almost a litre of full fat cream to make this, so for next time I’m going to find a recipe that uses milk instead of cream. But oh, the cream is so good. And if you only eat it once in a while, then who’s to know?


Homemade custard is surprisingly easy to make. It tastes richer and so much more real that anything you can buy in supermarkets. Once you try it for yourself, I don't think you'll ever go back to the plasticy, slightly fluorescent kind from a carton.


Chris and I had this for dessert on Sunday night while watching a movie we rented from the library. We had seconds and afterwards I didn’t feel full or overwhelmed by the sugar and creaminess at all. It's a relatively light dessert - the rhubarb and traces of cinnamon and star anise keeping the richness of the custard in check.

It's a bit chilly in London again this weekend. I feel like making another pot of custard and warming myself up. But, I'll resist. There are six egg whites waiting for me in the fridge, so I'll be good and bake something else equally delicious if not quite as satisfying as a bowl of shiny custard. Coconut macaroons? To be continued....


Vanilla Custard
(adapted from Modern Classics Book 2 by Donna Hay)

3 cups (24 fl oz) single or pouring cream
1 spilt and scraped vanilla bean (or 1 teaspoon vanilla essence)
6 egg yolks
1/3 cup caster sugar
2 tablespoons cornflour
1/3 cup milk

Heat cream and split vanilla bean and seeds (or vanilla essence) in a saucepan over a low to medium heat until hot but not boiling. Stir regularly to keep from scorching the bottom of the pot.

Whisk together egg yolks and caster sugar until doubled in volume.

In a separate bowl, mix cornflour and milk until well combined.

Slowly pour the hot vanilla cream over the egg mixture, one ladleful at a time, whisking well during and after each addition to ensure the egg does not separate. Whisk in the cornflour mixture until combined. Return to the saucepan and stir slowly over low heat for 4-8 minutes until the desired consistency is achieved. The longer you leave the custard to cook, the thicker it will become.

Serve warm. Makes about 3 1/2 cups.


Baked Spiced Rhubarb
(adapted from Nigel Slater in The Observer Magazine)

400g young rhubarb
3 heaped tablespoons liquid honey
a small orange
a cinnamon stick
2 whole star anise

Set the oven at 160°C. Trim the rhubarb and cut it into short lengths. Put the pieces into a baking dish, then trickle over the honey. Zest the orange then cut in half and squeeze the juice over the rhubarb. Add the orange shells to the dish along with the cinnamon stick, star anise and orange zest. Cover with a piece of foil or a lid, then bake for 30 minutes, or until the rhubarb is soft but has kept it's shape.

Serve a few pieces spooned on top of some of the warm vanilla custard.

Read more...

EGYPTIAN CHICKEN WITH APRICOTS + FIGS

>> Monday, April 26, 2010


Spring has arrived in London. It's such a different experience from the change in season back home which is much gentler and less noticeable. All the trees down our street are either in bloom or already covered in new leaves. I know I'm meant to be craving salads and crunchy, fresh things now that the warm weather is upon us, but a couple weeks ago there was still enough of a chill in the air to remind me of the snow and icy wind we'd recently escaped. I wasn't quite ready to give up the warming, hearty dishes of winter.

A tagine sounded just about right. Perfect for a chilly day but so full of the flavours of summer that you can hardly call it winter fare. Whenever I want to cook something from the Middle East, I always turn to recipes from my favourite New Zealand chef/cook, Julie Le Clerc.


Inspired by the heritage of her Lebanese great grandfather, Julie traveled to Morocco, Lebanon, Turkey, Azerbaijan, Egypt, Jordan and Iran; a journey culminating in two beautiful cook books on the food and culinary traditions of the Middle East. I have given both of these books to Chris' mother Barbara. Everything either of us has made from their pages has turned out wonderfully and several of the recipes have even become regular favourites.

The dish I chose to cook last Sunday night was from the second of the two, 'Taking Tea in the Medina'. ('Made in Morocco' is the first.) I've made this recipe a few times, and every time I do, I remember why. Because it's so delicious. It's fragrant yet simple, enticing yet honest. The kind of food I love.


Every step in this recipe is easy. There are no exclusive or hard-to-find ingredients and, as long as you take your time and don't try to rush it, it will turn out exactly the way it's meant to.


You can serve it as it comes or with a dollop of thick, plain yoghurt on the side. I also made a quick salad of sliced cucumber and fennel, sprinkled with fresh mint leaves and dressed with a drizzle of extra virgin olive oil and the juice of half a lemon.


I can't wait to start traveling through this part of the world and experience first hand what I have only seen in the pages of a book or on a screen.

In the mean time, my kitchen is an adequate substitute – clouds of cinnamon and cumin laced steam rising from my cook top. Halving dried figs and apricots, the sugary, concentrated juice coating my fingers. Filling a cast-iron pot with layers of ingredients and covering and baking until meltingly soft. The heavily spiced aroma of cooking in the air.

A worthy send-off to our first winter in London!


Egyptian Chicken with Apricots + Figs
(slightly adapted from Taking Tea in the Medina by Julie Le Clerc)

12 chicken thighs (with bone in)
sea salt + freshly ground black pepper
olive oil
1 cup dried apricots
1/2 cup dried figs, halved
1/4 cup raisins or sultanas
2 onions, finely sliced
2 teaspoons each ground cinnamon + coriander
2 1/2 cups chicken stock
1 1/2 cups long grain rice

1. Preheat oven to 190°C. Season chicken with salt and pepper. Heat a frying pan, add a little oil and brown chicken pieces for 5-6 minutes on each side until golden brown. Remove to a roasting pan or dish and scatter with apricots, figs and raisins.

2. In the same frying pan, cook onions over a gentle heat in a little more oil for 10 minutes until softened but not coloured. Add spices and fry for 1 minute. Add stock and bring to the boil, then pour this sauce over the chicken. Bake uncovered for 45 minutes.

3. Cook rice in boiling water for 10 minutes, then drain well. Season with salt and pepper and place in a buttered ovenproof dish. Spoon chicken and sauce on top. Cover with foil (and a lid if you have one to go with your oven dish) and bake for a further 30 minutes or until chicken tests cooked - when a sharp knife is inserted to the bone and the juices run clear.

4. Adjust seasoning with salt and pepper if necessary before serving.

Serves 6

Read more...

APPLE CAKE WITH HONEY AND CINNAMON CRÈME FRAÎCHE

>> Wednesday, March 31, 2010


The other day I noticed a few apples sitting in our fruit bowl looking dejected. They were starting to develop that sweet-honey smell that means their past their eating best but are perfect for baking.


Apple cake? I had a lovely, simple recipe I’d used a few times; a fairly basic butter cake with apple quarters scored and pushed gently into the soft batter and coated with apricot jam, which I’d found in one of my mum’s Australian Women’s Weekly cookbooks. I hunted through my handwritten recipe journal and file of cut-outs with no success. It was 3 o’clock in the morning in New Zealand, so I couldn’t ring my mum and get her to read the recipe out to me over the phone. Sometimes it’s so frustrating not living in the same time zone as your family. It makes the distance even harder since you feel so completely disconnected. Eating a slice of homemade apple cake would make it slightly easier to bear though. So I set about finding a new recipe to try.


I decided to look for one that was a bit different from my original recipe – trying to find one similar would surely only lead to disappointment. On the Waitrose website I found a recipe for ‘Organic Apple Cake with Honey and Cinnamon Crème Fraîche’. It was the layer of caramelised and finely sliced apple that really grabbed me. It looked shiny and delicious; this was the one.

First of all, I have to tell you that I chose this recipe despite the fact it claimed to be ‘organic’. Anything can be organic if you stick the word ‘organic’ in front of every ingredient listed. I also chose it even though everything in the ingredients list is measured in grams rather than cups or mls. Something which is particularly frustrating for me as I don’t yet own a set of scales.... It’s on my ‘to do’ list. Luckily I’ve found a great website which converts weights of different ingredients into various units. It’s pretty hard to get completely accurate though – 0.66 of a cup anyone? Electronic scales will be my next kitchen purchase. I just need to find some I like. It’s harder than you would think.

So – even though this cake was teetering on the edge of the ‘too-hard basket’ and had me scoffing at it’s ingredients list, I persevered. Lucky cake.


A very, very easy cake to make. (As long as you ignore the fact that I was continually running back and forth between the kitchen and my laptop on the dining room table trying to remember conversion quantities!) The batter couldn't be simpler and while the apples are slightly fiddly to arrange, they look pretty and it only takes about 5 minutes. The cake itself actually improves after a day or two, so I would recommend baking it the day before you intend to serve it. If not, it's a lovely light cake fresh from the oven.


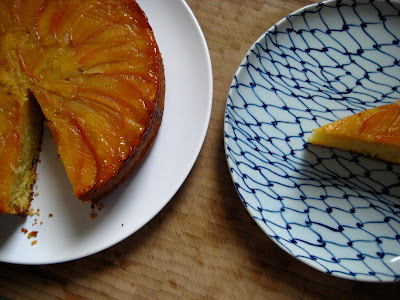


I ended up taking this as a dessert for dinner at Anna and Carl’s house. I’m so glad I did, as had I not, I would never had tried the Honey and Cinnamon Crème Fraîche (which would have been a bit of an extravagant addition just for the two of us). Flavoured creams have never really caught my attention before, and they’re definitely not something I would usually make on a regular basis – save the Chantilly cream my family makes instead of ordinary whipped cream. (I don’t think I can remember a time when we’ve whipped cream to go with something sweet and not included a teaspoon of castor sugar and a small splash of vanilla essence. Infinitely better than plain.)

This Crème Fraîche is worth the little extra effort it takes to assemble - particularly with a delicately flavoured cake such as this. It transforms what could be an ordinary tea cake into something special and worthy of dessert. If you can't get hold of crème fraîche, whipping or double cream will be fine. Just make sure it's whipped to a thick consistency before adding the cinnamon honey.

Just to let you know; I tried this twice - the first time with whipped double cream because that was all the Tesco up the road had in stock, the second time with crème fraîche. I can't decide which is better. I liked the double cream; it was lighter and sweeter and allowed the taste of the cinnamon and honey to stand out. Chris preferred the crème fraîche; he said he liked the slight lemony tartness alongside the apples in the cake. So the jury's out on that one - but which ever you choose, be rest assured it's good no matter what.

While I know that no cake will ever be wonderful enough to keep the homesickness blues completely at bay, the comforting smell of any cake gently baking in the oven will always help - at least a little.


Chris and I are off to Paris for the Easter holiday weekend! So no more posting until next week sometime, but I'm sure I'll bring back lots of photos of amazing confections and french delights to share. À bientôt!


Apple Cake with Honey + Cinnamon Crème Fraîche
(adapted from the Waitrose Website)

For the cake:
2 eating apples
225g demerara sugar (or raw sugar)
200g butter, softened
3 room temperature free range eggs, beaten
200g self-raising flour
150g pot natural yoghurt

For the crème fraîche:
500g crème fraîche
2 tbsp liquid honey
1/2 tsp cinnamon

1. Preheat the oven to 180°C, gas mark 4. Lightly grease a round 20cm loose-bottomed cake tin, line the base with baking parchment, then grease the top of the parchment.

2. Core the apples and slice thinly (no need to peel). Put them in a large bowl, add 25g of the sugar and toss well to coat. Arrange the slices in the tin, overlapping them slightly to form circles. Make sure there are no gaps between the apples as this will result in uneven areas where the batter will show on the top of the cake.

3. Beat the butter and remaining sugar together until light and fluffy, using an electric hand whisk or wooden spoon. Add the eggs, a little at a time, until they are fully incorporated and the mixture is smooth. If the mixture begins to curdle, simply add a spoonful or two of the flour and continue to add the egg. This should not happen if your ingredients are at room temperature and you make sure to add the eggs only a little at a time.

4. Fold in the remaining flour and yoghurt, then carefully spoon the mixture over the apples. Place the cake tin on a baking tray and bake for about 1 hour, or until golden and springy to the touch. Remove from the oven and leave to cool for 20 minutes or so. Turn the cake out onto a wire rack and leave to cool completely.

5. Spoon the crème fraîche into a serving bowl. Beat the honey and cinnamon together, then stir gently through the crème fraîche. Chill. Serve the cake in slices, with the honeyed crème fraîche.

Read more...

SEARCH NATKIN

Copyright: All images and text appearing on this blog (nat-kin.blogspot.com) may not be reproduced, copied or manipulated without the written permission of Natalie Graham © 2010

  © Blogger template 2009

Back to TOP